Programming Adapter
You need a suitable programming adapter, see our programming hardware page.
Download the Espressif Windows software
Download and install “Flash Download Tools” in the Tools section from: https://www.espressif.com/en/products/hardware/esp32/resources
Programming instructions
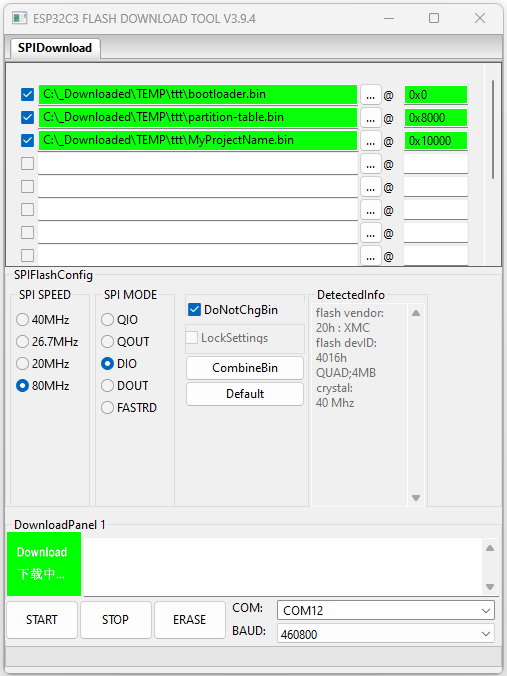
Run the flash download tool “flash_download_tool_v#.#.#.exe”
Chip Type: The model of ESP32 being programmed (see the parts list or circuit schematic)
Work Mode: Develop
Load Mode: UART
Select the “SPI Download” tab
Select the following 3 files to program with:
bootloader.bin
partition-table.bin
this_projects_firmware_file.bin
and enter the start address after each (starting with “0x”)
Tick the checkboxes next to each file
SPI Speed: (get from build information)
SPI Mode: (get from build information)
COM: Select the COM port your programming adapter is connected to (the higher COM port number for the ESP-Prog)
BAUD: Set the BAUD rate (get from build information, 460800 typically fine)
To programming each ESP32
Power your PCB if necessary.
Press “START”. The bottom programming progress bar should appear and complete to 100%.
When “FINISH” is displayed press “STOP”
Your ESP32 is programmed and should run (reset it / cycle the power if necessary).
How to get the settings to use for your project
Build your project in VS Code and then program your board using the “ESP-IDF Flash Device” button (lightning strike).
In the TERMINAL window (with “ESP-IDF Flash Task” selected) you should have a line like this:
Executing task: C:\Espressif\.espressif\python_env\idf5.0_py3.8_env\Scripts\python.exe C:\Espressif\esp\esp-idf\components\esptool_py\esptool\esptool.py -p COM12 -b 460800 --before default_reset --after hard_reset --chip esp32c3 write_flash --flash_mode dio --flash_freq 80m --flash_size 2MB 0x0 bootloader/bootloader.bin 0x10000 MyProjectName.bin 0x8000 partition_table/partition-table.bin
From this you want the start address of these 3 files:
bootloader.bin
partition-table.bin
firmware_file.bin
Based on the above example, these are
0x0 bootloader/bootloader.bin
0x8000 partition_table/partition-table.bin
0x10000 MyProjectName.bin                    <Will be named with your projects name
You can also obtain the following other settings:
-b 460800          <This is the baud rate used
--chip esp32c3     <This is the ESP32 part number
--flash_mode dio   <This is the SPI Mode
--flash_freq 80m   <This is the SPI Speed (m = MHz)
Find the 3 .bin files in your projects build subdirectory, these are the files you’ll use to program with.
MyProject\build\bootloader\bootloader.bin
MyProject\build\partition_table\partition-table.bin
MyProject\build\MyProjectName.bin
Programming this device example setup
8 months ago
Is there a way to securely program the ESP32 in an untrusted production environment like for example ST provides it with SFI (secure firmware install)?
4 years ago
You can load SPIFS.bin from a folder within your project.
With a forth line in the programmer.:- yourpath\spiffs,bin 0x110000
partition for 4Mb ESP32
# Name, Type, SubType, Offset, Size, Flags
# Note: if you have increased the bootloader size, make sure to update the offsets to avoid overlap
nvs, data, nvs, 0x9000, 0x6000,
phy_init, data, phy, 0xf000, 0x1000,
factory, app, factory, 0x10000, 1M,
storage, data, spiffs, , 0xF0000,
Using platformIO its easy to make the spiffs.bin